Rocky Road Cookies

Last week I found myself lying down on the kitchen floor in the middle of the day because everything felt just a bit too much. As I stared up at the ceiling, I tried to talk myself out of the “too loud, too scary, too busy, too needy, too everything” spiral by thinking of something wonderful and frivolous I could do this weekend. I landed on cookies. I spent today baking until I perfected a completely nonessential, gratuitous, absolutely delightful rocky road cookie recipe. I have no regrets.

I’ve been staunchly anti-nut in baked goods for my entire life but I have to believe that we can grow as people or else what is the point? You’ll never find me putting a walnut in a brownie (like, ever) but if I can’t make space for a perfectly roasted almond in a rocky road cookie? That’s not a life I want to live.

If you can’t bring yourself to open your heart to nuts in cookies you’ll find no judgment from me (it took me 38 years to get here) just leave them out, nix the almond extract, and call them “hot chocolate cookies.” Or! Leave out the nuts, swap the almond for peppermint extract, and have some festive “peppermint hot chocolate” cookies! Play with these cookies is what I’m saying. Get up off the kitchen floor and measure some ingredients. It’s good for the soul.

Last year when I was searching for holiday cookies to bake, I found a recipe for S’mores Cookies. I made them and fell in love with what happens to the mini marshmallows. They get slightly crisp on the outside, and taste of faintly burnt sugar like the perfect campfire marshmallow, but the inside gets almost caramelized and chewy. The cookie itself was disappointing though. Dry and kind of bland and boring. I couldn’t stop thinking about the mini marshmallows, though, so I decided rocky road would be the perfect way to incorporate them into a cookie. I’ve been making a lot of Grossy Pelosi Chocolate Chip Cookies lately, and I’m loving the new-to-me cold butter technique, so I decided to start with it and make some tweaks. This is where I ended up:
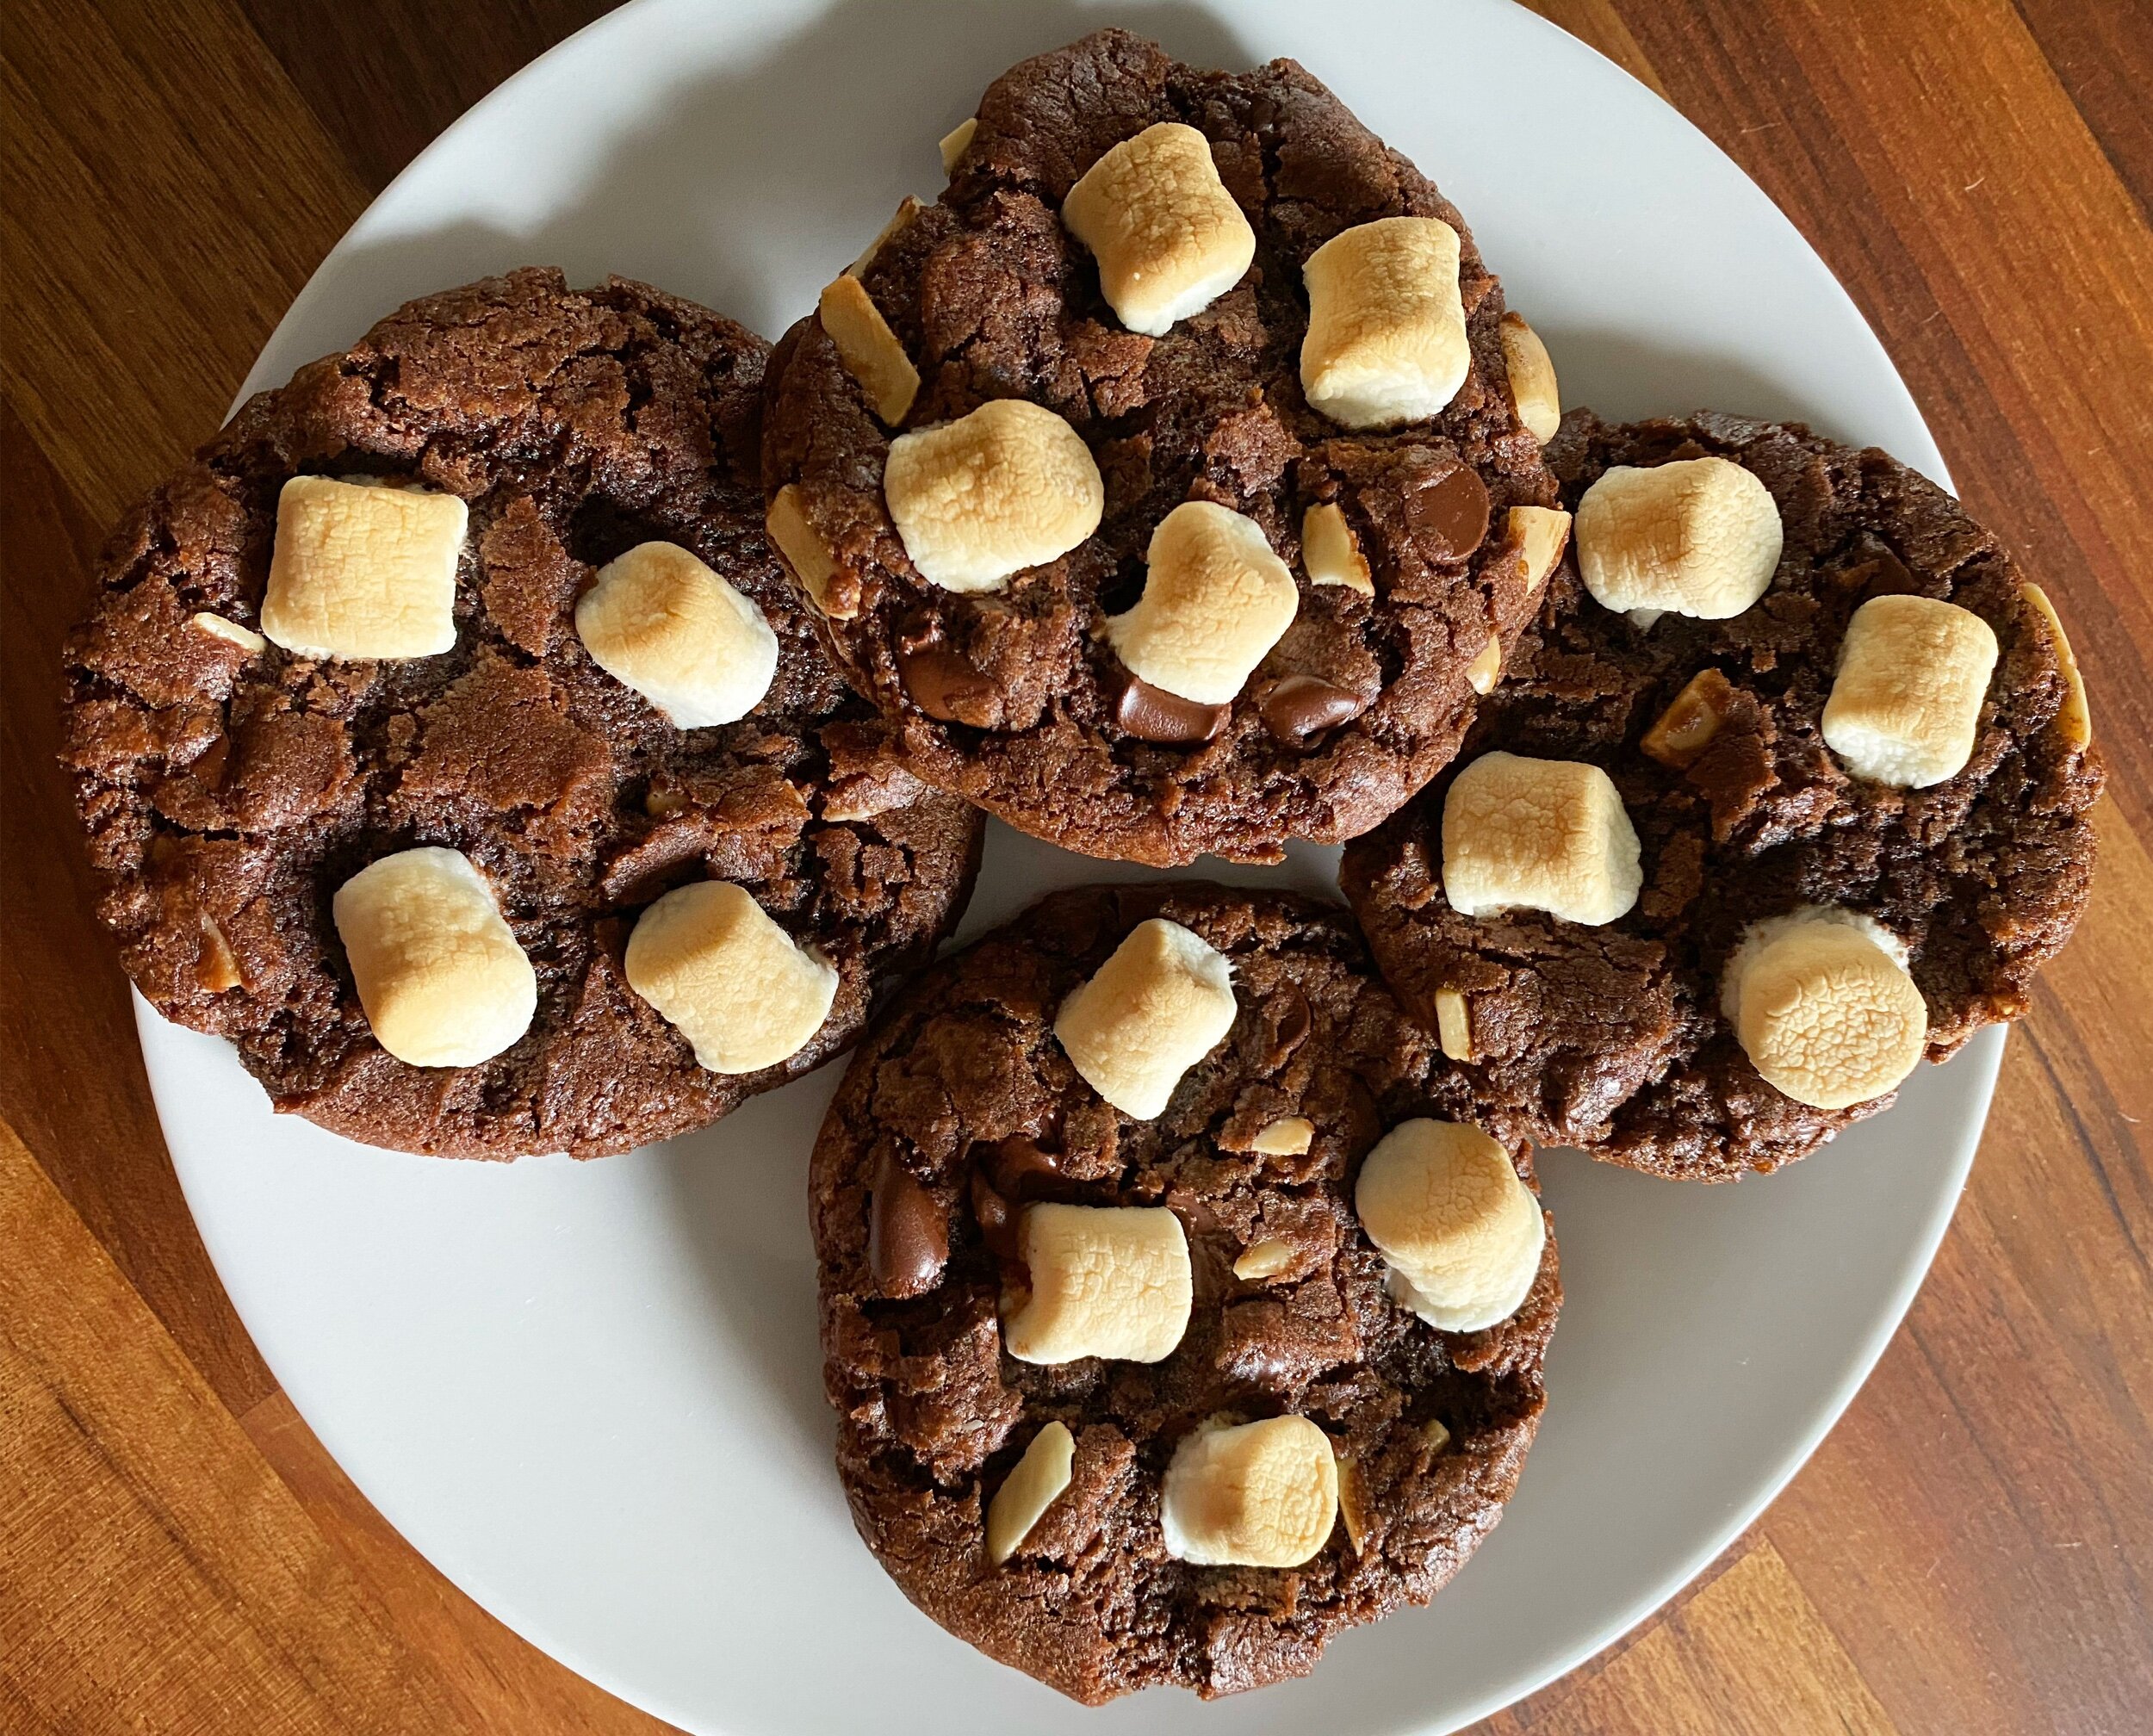
73DFB199-D5F3-44A3-8CC0-FF9D6DE5BF80.jpeg

Rocky Road Cookies

Ingredients

1.5 cups cold, unsalted butter, cut into cubes
1.25 cups granulated sugar
1.25 cups brown sugar
2 eggs
1 Tablespoon vanilla
1/2 teaspoon almond extract
3.5 cups all-purpose flour
0.5 cups cocoa powder
2 teaspoons baking soda
1 teaspoon salt
2 cups semi-sweet chocolate chips
1 cup chopped almonds (i used blanched almonds so I didn’t have to contend with almond skins but you do you. Maybe you want to use a different nut? I’m not the boss of you! You use whatever nut speaks to your soul, just don’t tell me if you use walnuts.)
Mini marshmallows (a small bag? I don’t know. This is where your individuality will shine. I will not tell you how many mini marshmallows to use. I will tell you that I use 4 - 5 mini marshmallows per cookie, and I get about 50 cookies from each batch.)

Directions

Preheat oven to 350F. Spread almonds on cookie sheet. Roast for 6 - 8 minutes, depending on how hot your oven is, stirring often, until golden brown. Remove from hot cookie sheet and cool on a plate. Turn off your oven. Conserve heat. We’re not baking the cookies until later.

Mix cubed butter, sugars, eggs, and extracts in a stand mixer until combined but not uniformly creamed. You want some small hunks of butter to remain and the goal is to keep the butter as cold as possible.

Dump your butter mixture into a large mixing bowl and use a wooden spoon to mix in flour, cocoa powder, baking soda, salt, chocolate chips, and cooled almond. The batter will be stiff and may not come together completely but that’s okay; we’re going to use our hands to form the cookies and our body heat will melt the butter just enough to make it all come together. TWSS.

Roll dough into balls (I use approximately one heaping tablespoon to form my cookie balls because I like a good-sized cookie. I get about 50 cookies from one batch. If you want more cookies, or smaller cookies, use less dough to form your balls. Measure it with your heart.) Throw them all on a cookie sheet and freeze for at least 30 minutes.

Preheat oven to 350F. Prepare a cookie sheet by lining with parchment paper (making sure you do the @grossypelosi parchment paper trick). You want to space your cookie balls about two inches apart so they don’t stick together in one giant cookie when you bake them but how many you can fit will depend on the size of your cookie sheet. I do 8 at a time. Put however many cookie balls you can fit onto your cookie tray with appropriate spacing and bake for 6 minutes.

After 6 minutes, remove your cookie sheet from the oven, gently press 4 - 5 (or more! or less!) mini marshmallows into the top of each cookie. Put the cookie sheet back into the oven and bake for an additional 9 minutes until the tops of the marshmallows are golden. Let cookies cool slightly on the cookie sheet so they harden enough to be removed without falling apart. Enjoy!

A few things:
- If you want a crispy cookie, you need to bake them a little longer. 15 minutes is long enough for a slightly crisp outside with an ooey gooey centre.
- If you don’t want to bake your entire batch at once, transfer your freezer balls to a ziplock freezer bag and keep frozen. You can bake them directly from the freezer by adding a few minutes to the bake time (I do 18 minutes for frozen solid balls and they turn out perfectly).
- If you want to take these cookies to the next level, sprinkle a little flaky sea salt on top of each cookie after you put the marshmallows on, before you do the second bake.
- The almond extract is really subtle; if you prefer a more aggressive almond taste, bump it up to a teaspoon or more. Half a teaspoon gives the cookies a hint of nuttiness but it’s not overpowering. If you don’t like almond extract, just leave it out completely.

Existential Bread: Dessert Edition

My desperation baking took a festive turn this week. It was Shawn’s birthday on Friday so I made him this Creamy Small Batch Cheesecake. I’ve never had to learn how to make cheesecake because my little sister is a master cheesecake baker; I don’t even own a 9-inch springform pan. Whenever we’re out for dinner, Shawn gravitates to the cheesecake on every dessert menu so I decided to give it a go. This cheesecake is made in a loaf pan, which may have been where I went wrong. I baked it in a glass 9x5 loaf pan and it would not set. The instructions say to bake until the centre is set and I’m familiar with what an unset centre looks like. I was confident I knew what I was looking for, but I ended up having to bake it for 12 minutes longer than the bake time stated in the recipe. Maybe I shouldn’t have baked it in glass? All I know is I ended up with a dry cheesecake. It was fine because I topped it with a mixed berry compote and lots of whipped cream, which hid the sad state of the cheesecake underneath, but I knew in my heart that I was serving substandard cheesecake.

But! All was not lost! When Grady found out I was serving birthday cheesecake instead of our family tradition of birthday chocolate cake, he requested a second cake. Who am I to say no to more birthday celebrations? I physically cannot do it. So I also made my standard chocolate cake and topped it with a whipped chocolate ganache. It was the tits. There’s no humble way for me to say it: I make amazing chocolate cake.

To carry the cake theme through the long weekend, I also made Bon Appetit’s Rhubarb Custard Cake. I’m a jerk who tweaks a recipe before I’ve even tried it once, so this is how I made it:

  • I used orange zest instead of lemon zest because orange with rhubarb is what dreams are made of.

  • I used brandy instead of rum because that’s what I had in my liquor cupboard.

  • I added 1/16 tsp of ground nutmeg and 1/4 tsp cinnamon to the dry ingredients for the barest hint of spice.

  • I baked it in a 9-inch square baking pan because I don’t own a springform pan.

This cake is outstanding. It’s dense and buttery and tart and gorgeous. The next time I make it, I’ll sprinkle a tablespoon or so of orange juice on top of the rhubarb, the same way you sprinkle lemon juice over the plums in Smitten Kitchen’s purple plum torte. I think it’ll add a bit more punch and help the sugar sprinkled on top caramelize.

24B212D0-DD20-47E0-BE03-B05E3ED6CF81.jpeg

I ended my baking tour with a simple rhubarb crisp. I’m a sucker for rhubarb season. I need to plant some so next spring I can just run out to the yard whenever I want to bake something delicious.

This week will be light on the baking, I reckon. Poppy’s birthday is next week so taking a week off to eat some leafy greens is probably a good thing. Though now that I say that, Poppy hates chocolate and has requested a “pink doughnut” cake, so I guess I should spend this week figuring out what that means. Girlfriend hates chocolate so my go-to cake is a no-go. If you’ve got a recipe for a simple white or yellow cake, please let me know!

Existential Bread

I saw someone on Twitter refer to all of the quarantine baking we’re all doing as “Existential Bread” and it tickled me so much. The play on words, yes, but also the thought of all of us connected by dusty piles of flour on our counters and deep sighs of ennui.

A few days ago a friend asked for recipe recommendations because she wanted to do some baking, and it was a joy to read through the thread of responses. I suggested she make the loaf I’d just made (and devoured) and all of a sudden there was a group of happy bakers excited about the same thing I was excited about. It was a bright spot in an otherwise difficult day and I wanted to share it.

I’ve always found baking to be therapeutic so it’s no surprise that I’m doing a bit of baking these days. I’m going to share some of the recipes I’ve made, and some I want to make, here as a kind of record. I’m afraid these days will melt away when we find a new normal, and in some ways that will be a blessing but the thought also make me a bit sad. These days are challenging and long and frustrating but they’re also important.

The loaf I made (and devoured) last week was this Apple Fritter Bread. It’s so easy to make and tastes so delicious. The brown sugar component felt a bit excessive when I was making it, but the quantity is necessary to achieve the full fritter-ness in my opinion. I didn’t do the full glaze but I’m a sucker for an apple fritter so I did glaze the top a little. The next time I make it, I’m going to add the zest of half a lemon to the batter to brighten it up a bit. I used Granny Smith apples and I’ll definitely do that again rather than use a sweeter apple.

I also made this Cinnamon Raisin Sourdough Bread (without the raisins because raisins are of the devil) and it was outstanding. The only changes I made are: I eliminated the raisins (as one should) and I used 2 Tbsp melted butter in the filling instead of an egg + water. I haven’t been making much sourdough lately because flour is getting more difficult to find at the grocery store, but this is a nice way to use up the sourdough discard when I feed my starter every week.

I also made a Rhubarb Custard Pie to celebrate the seventh anniversary of my first thyroid surgery because I will find literally any reason to celebrate with pie.

This week I’m planning to make pretzel rolls for bbq pulled pork sandwiches and garlic knots. The DoubleTree Signature Cookie will round out my week of Existential Bread.

Have you baked anything recently that made you feel a shred of happiness inside? Share with the class!

IMG_7927.jpeg

Grandma's Pumpkin Chiffon Pie

This pie reminds me of childhood. My mom’s family was all back east, so holidays were spent with my dad’s side of the family. My grandma would make her pumpkin chiffon pie every Thanksgiving. I was totally unaware that this wasn’t the traditional pumpkin pie of holiday lore. The first time I had a slice (brick) of standard baked pumpkin pie, it was a rude awakening. Grandma’s pumpkin chiffon pie is light and fluffy and perfectly spiced. It’s perfect after a heavy holiday meal, but it’s even more perfect as leftovers the next morning for breakfast. This pie must be topped with a generous pillow of freshly whipped cream to reach its full pumpkin pie potential.

public.jpeg

Grandma’s Pumpkin Chiffon Pie

Ingredients

One 9-inch pie shell, baked and cooled
1/4 cold water
1 envelope unflavoured gelatin
1-1/4 cup pumpkin puree (not pumpkin pie filling)
1/2 cup milk
1 teaspoon cinnamon
1/2 teaspoon salt
1/2 teaspoon ground ginger
1/4 teaspoon nutmeg
Pinch ground cloves (optional)
1 cup granulated sugar, separated
3 eggs, separated*

*The egg yolks are cooked into a sort of custard but the egg whites are whipped and incorporated into the pie filling raw. If you’re like me and feel squicky about eating raw eggs, separate your yolks and save the egg whites for an omelette. You can buy pasteurized egg whites in a carton near where the eggs are sold in most grocery stores (make sure you buy egg whites specifically and not whole eggs). If you go this route, there’s a tiny bit of math involved because you’ll need to multiple however many tablespoons of pasteurized egg white you’d sub for one egg by three for this recipe.

Directions

You need a double-boiler for this recipe but the good news is that if you don’t have one, you can easily fake it. Fill a pot with an inch or two of water and bring to a boil. Reduce heat to a simmer and cover with a heat-safe mixing bowl that’s big enough so the sides are wider than the mouth of the pot. You want your bowl to sit in the mouth of the pot and hang down into the pot but not be submerged in your water. I like to use a glass Pyrex bowl so I can easily check that my water is still boiling by scraping the bottom of my bowl (so I don’t have to lift the side of the bowl and let my precious heat escape).

Soften gelatin by sprinkling it over the cold water and letting it sit for at least 10 minutes. You don’t need to stir it into the water.

In the top of your double-boiler (or mixing bowl) combine pumpkin, milk, spices, salt, 1/2 cup sugar, and egg yolks. Whisk together and continue stirring until thick. You want the water in the bottom of the double-boiler to remain at a gentle boil so your mixture will cook. Cook and whisk occasionally until your mixture thickens to pudding consistency (about 10 - 15 minutes). Remove from heat and whisk in gelatin mixture.

Cool. I usually pop my pumpkin mixture in the fridge for about 30 minutes to bring the temperature down. If you mix your egg whites in while it’s still too hot it will kind of curdle and break. This pie sounds a bit high maintenance, I know, but trust me; it’s worth it.

In a clean bowl, whip egg whites until frothy. Gradually add remaining 1/2 cup sugar and beat until stuff peaks form. Fold the egg whites into the cooled pumpkin mixture until well combined. Pour into baked (cooled) pie shell and chill.

Serve with oodles of fresh whipped cream and the smug knowledge that you win Thanksgiving, you devilish Pie Master.

public.jpeg

{this post contains affiliate links}